
Today I am bringing to you a quick "101" on how to work properly with intricate DIES and very effective tips when die cutting!...

1- How to release your paper when it gets stuck inside an intricate die without tearing it?
Place between, the die and the paper, a piece of "WAX cooking paper"!...this type of paper helps release the paper from the die! It comes out like butter!!!

2- Where to place all the dies when die cutting without loosing them!...specially when using tiny and several ones at the same time?
I created a "MAGNETIC" surface at my "die cutting station"... in my craft room

I cover the side of this storage unit with a magnetic adhesive sheet and covered it with "white Con.Tact" paper to blend it with my furniture..
Who knew that this wood storage unit is "magnetized"?
I use this...

And I "magnetized", as well this acrylic photo holder to place my tiny dies in my desk when I am working with them...and not loose them!
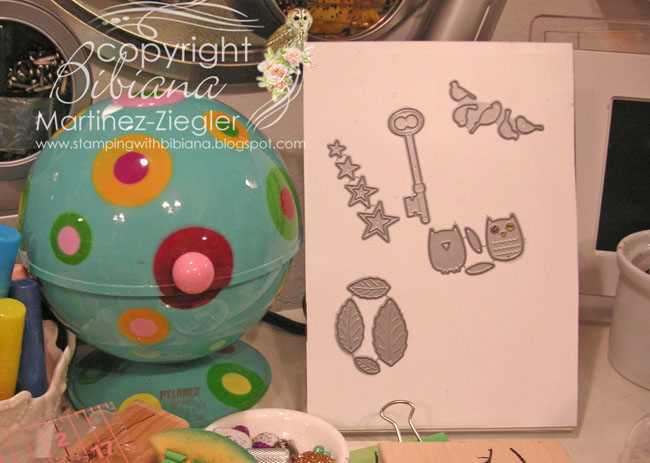
using the same products...as mentioned above...
|
|


3- MUST have tools when Die cutting:

-Remember when die cutting intricate dies use a Metal Plate as a shim along with your plates or place extra cardstock on the area that is having a problem when cutting...
-Use a Tool Pick to release the paper from the die
-Have a Makeup Brush to dust your dies, your plates, your working surface...after cutting there is alwasy "DUST" from the paper fibers...
-tape your die to the paper, specially when die cutting several pieces, with Removable Tape in order to avoid shifting when cranking your machine
-Place some Wax Paper between die and paper when cutting intricate dies...
- Nail brush, great to dust the big die cutting plates made out of that black foam like the ones from Tim Holtz
- Scissors ; did you see where I hang them from? look above...on my "magnetic" surface
4- About your CUTTLEBUG machine...or other die cutting machines...

a- Write the "Recipes for the Sandwiches" and glue them to your machine...
I use my "P-touch label maker" machine to make those labels...
b- try to place your dies on the edges, or corners, we tend to place everything in the middle section and with time your rollers get worn and have less pressure... so use other areas less used ...
c- REPLACE your plates from time to time with new ones... having too many cracks/ scratches or bends will make the die cutting less effective and the cardstock will show wrinkles from the used/worn plates...
Ok Dear friends, I hope I gave you some new ideas or tips that you can implement in your work area...when working with all your dies...
Come back soon, because I will have on the side bar on the ORGANIZATION section, How to organize all your Dies...and you will have a pick into my Heaven..of Dies!!!
for now, Have a nice day!
SUPPLIES:


These are great tips thank you. I'll be
ReplyDeletetrying out the wax paper the next time
I use an intricate die.
Merci pour ces bons conseils! Toujours très utiles à connaître!
ReplyDeleteWow, you are so organized! Thanks for the great tips!
ReplyDeleteOh your a Jewel to list this. Can't thank you enough, as I am a Die nut. While I use most of what you have listed there were several things I did not realize one should do. If it is hard to find a tool to poke out the pieces, ask your dentist if he has some old tools. Mine gave me mine and they are GREAT to do this.
ReplyDeleteHey Diana: great tip for the dentist...I got mine (see picture on tools) at my craft store and they are from "Cherry Lynn" called "Crafters Tools"...
Deletebibiana
hi bibiana, this is a great tutorial; thanks for sharing all your tips! i LOVE the idea of the acrylic frame for the tiny dies and will have to make myself one. i was curious to know what kind of glue you use as i just bought the hello die yesterday; so far, a glue pen is working ok.
ReplyDeletelinda
Hi linda:
DeleteThere are 3 choices:
1- my most used one is the "Tombow mono multi liquid glue", with the fine tip...
2- then I use the "Zig 2 way glue pen" for very tiny words...
3- AND...last the "Xyron 150 create a sticker 1.5"...
I have a free download sheet with all the adhesives in my section "More" on the top bar...or click here:
http://stampingwithbibiana.blogspot.sg/p/list-of-adhesives-for-more.html
hope it helps,
bibiana
hi bibiana, thanks so much for taking the time to answer my question; this is a big help!
Deletelinda
Just read through this post, great tip with the dusting brush.
ReplyDeleteI usually use a soft cloth but the brush will be much better off to look one out.
Thanks for the great tip
Patricia. xxx
Hi Bibiana, thank you for these suggestions
ReplyDeletemarta