hover over

HOVER OVER ANY PHOTO AND SHARE IT ONTO YOUR
PINTEREST, FACEBOOK OR TWITTER ACCOUNTS


Showing posts with label brayer. Show all posts

Saturday, May 2, 2015

Ombré Technique - Lavinia's challenge #5 Pink and Blue

Hello Dear Stamper Friends:

as you may know, Lavinia's Stamps hosts a monthly challenge at the Lavinia's Challenge Blog...
and every 2nd of the month we, the DT (design team) are bringing to you some inspiration for you to play along us ...
this month the theme is pink and blue...


 For my "Pink" card I used the "Ombré" technique!

ombre technique card front with lavinia stamps


which consists in using different shades of color to achieve a gradient shade, it is the graduation of color from dark to light...and it is very know in hair color,  but you can applied it to anything...in paper crafting you can do it with any material that you wish: with pieces of cardstock, ribbons, inks, embossing powders, glitter, paints etc...

ombre technique card side with lavinia stamps

 Here for my card I used, distress inks in pink going from dark to light...then I gold embossed the flowers.

ombre technique card detail with lavinia stamps

 a side view

ombre technique card last view with lavinia stamps


For my "Blue" card I stamped the Lavinia "Floral Spray" stamp  using some "mica-gloss" from Judikins (which is a highly pigmented and pearlescent metallic ink) on white and black glossy paper.

mica-gloss ink card front with lavinia stamps


Steps for the backgrounds...
on white glossy paper squeeze some drops of different color of inks, use the "brayer" over this to mix lightly the paints, no particular way.
The photo show 2 papers, you only need to make ONE...
I was doing it to use in later backgrounds, see below!

mica-gloss ink card step 1

This mix on the white glossy paper "acts" as a palette, as a stamp pad;
ink your stamp from this mix and stamp the image onto a 2nd piece of glossy paper.
(paper on the left)

mica-gloss ink card step 2

Do NOT throw this "palette" (paper on the right), brayer over it again to smooth the paint,
this paper is the one used on the small squares.

mica-gloss ink card step 3

this is the shine resulting from these inks

mica-gloss ink card step 4

the black flowers come from stamping from that "palette/ink pad" onto black glossy paper

mica-gloss ink card step 5

 when dry, heat emboss with black ink the fairies and the unicorn.

to see a card using the same technique, 
for the black flowers on black glossy paper 

doing this "palette" I got 6 backgrounds...

mica-gloss ink cards backgrounds

The last background was done by wiggling using this small tool, it can be a thootpick

mica-gloss ink cards background

This a last view, the shimmer is incredible!
and all that by just using around 8 to 10  DROPS of  "mica-gloss ink" !!!

mica-gloss ink cards side view with lavinia stamps

lengthy post 
but I believe with 2 great techniques!


Thanks for the visit, 
join us at Lavinia's Challenge 
and get to win a £40.00 to spend at Lavinia's website!
Good Luck!


SUPPLIES


Sunday, September 28, 2014

CAS Merci Fall Card

Hello My Dear Stamper Friends!

I hope you liked the "Throwback Thursday" post ...it is so nice to remember...Thanks  a lot to the friends who have joined me so far in this challenge...the gallery is still open!... 

For today, I am here to share with you a CAS (Clean and Simple) fall "merci"/Thank you card that I posted at the French blog: "Un brin de Créativité" for My DT assignments for Memory Box!

fall merci kaleidacolor front card
pin it:  

I made the background using "Kaleidacolor" inks and a brayer on glossy paper...

fall merci kaleidacolor front supplies

these inks come with 5 colors of ink in a raised pad...This one is called "autumn leaves"
You must roll the brayer several times to achieve a dense and uniformity color

fall merci kaleidacolor ink

Because of the color on the background, I did not add too many embellishments, I kept it simple, I just added some gold string, the "merci" word ( die from memory box) die cut in gold mirror paper and the "arboscello" tree, I decided to die cut it in white!

fall merci kaleidacolor card detail tree


A last view...you can see the shine of the Glossy paper...

fall merci kaleidacolor card  flat view


NOTE: 
- "Throwback Thursday" Challenge #1 closes on Tuesday,Oct 7th
- RULES AND INFO
- Winners announced on Wednesday, Oct 8th
- NEW "Throwback Challenge"#2 on Thursday, Oct. 9th


Thanks for the visit 
and lots of smiles!!!

SUPPLIES


Sunday, August 4, 2013

DIY Mini Brayer Or "Roltap" tool...

Hello Dear Stamper Friends:
I discovered this "new" tool called "Roltap", thanks to a video that Lindsay, a fellow DTM at "Lost Coast Designs"  posted in the blog...

After seeing her video I had to have right away that tool, but unfortunately as she pointed out later in another video it turns out that this "new" tool for me, was an "oldie" and that it is a discontinued item:(

So following some of her suggestions, I ran to Michael's and made my own version.
I created my own "Mini Roller Brayer" Or "Roltap" tool...
here it is my take...


What you need to make this fun tool is a bag of foam "marshmallows",  from Michael's, a small brayer to switch rollers, (you simply push  the red rubber roll to the side);  a kitchen knife with a wide blade (to cut the foam; my x-acto knife did not work), some BBQ skewers (not too slim), the beads and that's it...


follow the photo to assemble the tool...


I had a bag of beads and they worked perfectly to hold the foam in place...you can use pearls or other beads, otherwise the roller foam moves and the brayer falls apart.

Then in this very same trip I discovered this "Nifty" tool in the ceramics section...It is a wheel for sculpting, the wheels are in plastic not rubber but it works...


See sample comparison sheet on how they work each one of them...


I decided to make a card, of course!

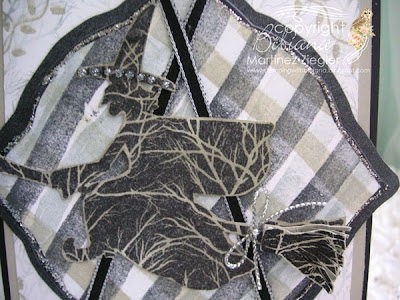
I used this fun "Silhouette Witch" stamp from "Lost Coast Designs",  to make this Halloween background card in order to showcase how the "mini Roller Brayer" works...


I first did my background in 3 different color inks (black, gray: "London Fog: Memento ink"  and "Pumice: distress ink By Tim Holtz")...
If you prefer straight lines I guess you can use a ruler...but I do not mind the crooked lines... it goes fast, less that 3 min...and I think that's the charm of the background.
I die cut it with a "Spellbinders" label  3 die.


Then I stamped a 2nd panel using a large Background "Three Branches" stamp from "Lost Coast Designs" and I used the "leaf wheel" on the corners...just to use both "new" tools in my card.


 detail of the background...


I decided to make a gingham pattern and the broom has several layers to add some dimension...


Hope you will get inspired as I was, ...THANK YOU, Lindsay!

Make sure to visit Lindsay's blog: "The Frugal Crafter" and watch her so energetic and informative video HERE


Follow on Bloglovin