hover over

HOVER OVER ANY PHOTO AND SHARE IT ONTO YOUR
PINTEREST, FACEBOOK OR TWITTER ACCOUNTS


Showing posts with label thanksgiving. Show all posts

Thursday, November 24, 2016

Bendi Card

Happy Thanksgiving!!!!

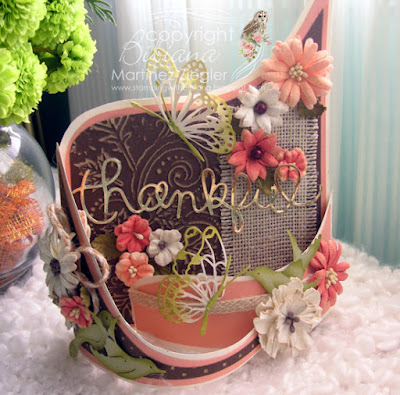
Bendi Thanksgiving card front

With this special "Bendi" card I want to wish you a wonderful day of Giving Thanks ...
I count every day all my blessings and for sure YOU my loyal followers are among them...

Bendi Thanksgiving card top view

opened
Bendi Thanksgiving card opened
sides
 right one

Bendi Thanksgiving card right side
left one

Bendi Thanksgiving card left side

 center panel
embossed with a fall "Darice" embossing folder
and sanded using "Core'dinations" paper to reveal under color
Bendi Thanksgiving card center panel

closure
I made a "longer" (than the original, see video) notch to insert on hole
and foam tape hide below the flower

Bendi Thanksgiving card closure

side 
"Memory Box" butterflies fold in half

Bendi Thanksgiving card side

 last
Bendi Thanksgiving card last view


The only difference with my original "Bendi" card is that this time 
I curved the front and back  flaps... 
to give it a new twist...
instead of cutting "rectangles"  
I curved the edges (free hand with scissors)

Here it is the Video that I made 
Enjoy!!!

or click HERE

 
Blessings
 

Supplies: Stampin'Up: "thankful" die ; long thinlit bird die (retired)


Thursday, November 10, 2016

Flower Pins in Felt

Hello dear Friends:

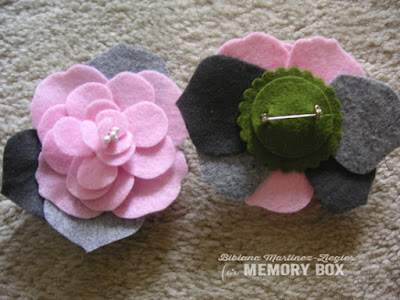
I made these flower "Boutonnières"/lapel pins for my mother's birthday...
upon arrival all the women invitees could choose the pin of their desire...

flower pins in felt

They are quite simple to make, you will need felt, Memory Box dies, brooches and a glue gun...
here it is how I made them..

This flower uses the "Plush Camelia" die from "Memory Box"
step 1: Die cut several petals
gather/glue  the smallest ones around 3 or 5 pistils
Note: you can skip the pistils and just gather 2 or 3 of the small petals and start gluing them to each other
some of my flowers do not have pistils, see photo.

flower pins in felt step by step

step 2: keep adding petals around, just place a dob of glue at the end of each petal


step 3; die cut some leaves (grey) and 2 circles (green) for the back


 step 4;
when finish adding petals add one circle
on the 2nd circle cut with scissors 2 small slots, to insert the brooch

step 5:
insert the pin and glue it


 step 6:
final result back and front

flower pins in felt back and front

for some other flowers to give a different look, you can start backwards
start with one circle (green) for the back and start gluing the petals (pinched) from the center outwards
to form a "cup"


here it is the "cup"
continue gluing petals


These are wonderful little souvenirs/favors for any party...
You could surprise your family for this coming Thanksgiving 
and give away these to make this special Holiday even more memorable

or how about some reds ones for Christmas
see photo below using the "Plush Anemone" die

here are the dies that I used...

flower pins in felt supplies


NOTE: use a high quality felt, it really makes a difference in the die cutting and in the end result of the look of the flower...leaving a clean smooth edge
See supplies below (felt from "Taylored Expressions")

Thanks for the visit...

Supplies