The California Rosemaling Association (CRA) organized recently a seminar having as a special guest the "Vesterheim Gold Medalist" (VGM) master painter and teacher Josonja Jansen.
I had the fortune and the opportunity to attend
Here are some of the highlights of that great painting convention!
So grab a cup of coffee, sit, relax and enjoy these photos...
because it is going to be a bit loooong :)
_____________ o _______________
We made 2 different projects; the first one a Norwegian utilitarian box called "tine" [tee-nah] and two Norwegian sandwich boards both in the "Telemark" style.
Day 1:
On this day we had to 'prep' our surfaces...
here is my place setting... having my boards and "Tine" box all painted in the designated background colors...
We were around 70 to 80 attendees
and I was lucky enough to be at the front sharing my table with my new painter friend Beth
Among the attendees they were two of my favorite and experienced teachers from whom I have taken classes.
My dear teacher and Friend Marley Wright Smith and my current Decorative painter teacher Carl Larson
on this photo as well on the front is Cheryl Banwarth, president of the CRA (in yellow)
Day 2:
We started painting the "tine" box...
This is Josonja's box
close up of the lid
and this is how Josonja sets her painting table with her palette, projects , camera, sketches etc...
On the seminar I got to see many cool ideas and new "gadgets" for painting
Look at these fabulous paint brush caddies...
and these "tools" are so cool and necessary
1-Josonja uses a heart pillow filled with lavender to support her wood projects.
These are amazing, they support your project fantastically
2- the 2nd photo on the top right is a Beautiful painted clip board to display your instructions and/or photos...supported by a wood quilt ruler holder...how clever!
I will be making one of these for sure!!!
3- and the last one is the handy screwdriver that Beth, my painting neighbor, had in her supplies!
For the convention, I made my own version of the Josonja's lavender Pillow...
Mine are filled with with beans and made out of hand wash clothes and in green of course to match my place setting :)
my beany bags in action...
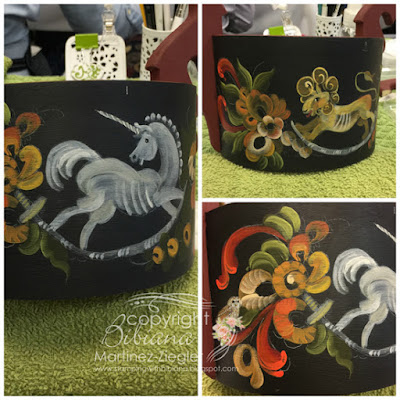
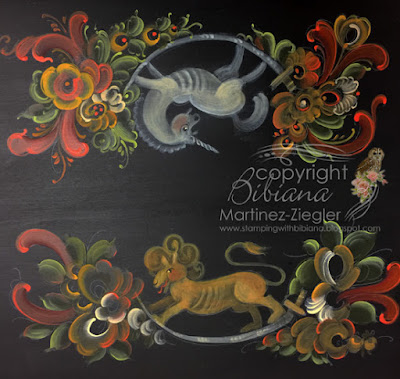
Some shots of the progress of MY "Tine" box...
close up of the Unicorn, the tiger and lastly the bouquet of flowers...
Day 3:
We continue and finished painting the "Tine" box...
For teaching purposes she paints on watercolor boards...
These are her teaching boards
In the evening we had a nice banquet with some food and performing some music from the "Barbershop Quartet" photo top right
Also, Gayle Oram, MDA and VGM came to the banquet dressed in traditional Norwegian clothes wearing the "Bunad"
At the banquet they were present 4 "Vesterheim Gold Medalists" 1st photo on the left:
Jurene While ; Josonja Jansen; Gayle Oram; Karen Nelson
top right 4 of the original founders of CRA: Marley Wright Smith (dressed in blue) among them, Jurene While and Hilde Henry...
and below the 2016 CRA comittee
Day 4:
Here is Josonja giving some advice...
The previous day we started painting the "sandwich boards"
here it is my basecoating and pattern traced...
on this last day we got to finish the boards...
steps of my progress...
but it was not all just painting time during the convention...
in the evenings we had fun and nice get togethers sampling the local restaurants that Carl knows so much...
in photo Marley, Carl, Peggy and Carol...
and during the day between breaks we had shopping time at the trade floor...
I got some unfinished pieces, raw wood, brushes, patterns, magazines and of course paint!
I step out as well to visit Josonja's studio and Museum; which was one block away from the hotel
her classroom
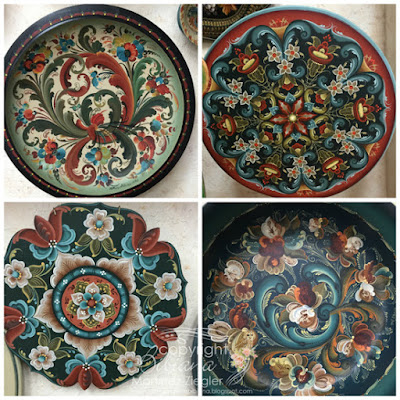
These are some of the wonderful works that I saw during convention...
amazing "Rosemaling" plates
and wonderful painting projects done by Josonja
some more inspiring pieces...
during class Josonja shared with us her incredible collection of sketches, ideas and magazine articles all on Rosemaling
Here is the map of the different regions in Norway, from where the names of the painting styles come from...such as Telemark, Hallingdal, Veat-Agder, Os etc...
her beautiful sketches/studies
After this intensive and very creative painting seminar, I decided to visit the northern California red wood forests, the vineyards and towns (in photo Mendocino)...
what an amazing collage of landscapes...
and enjoy the beauty of the Californian coastline...
From the window of my B&B and some shots from Mendocino
before arriving home, in the San Francisco, Bay area
I want to thank the CRA for organizing this special seminar
Josonja for sharing her passion with all of us and gives us some tools to pursue our dreams...
I had a wonderful time with my old and new fellow painter friends...
and my wish is that I can continue perfecting my painting skills on Rosemaling and maybe who knows down the road be able to teach and transmit the legacy of this "old" and almost forgotten style of painting!!!
Thanks to all my loyal readers that stayed until the end ...
I know it was a very LONG post
I hope it brought you some good souvenirs
(for the ones who attended)
(for the ones who attended)
and some insight for the ones that could not be there...
Cheers,
until next post...
until next post...
and Happy Thanksgiving week!
If you like what you see here subscribe to my blog...


