hover over

HOVER OVER ANY PHOTO AND SHARE IT ONTO YOUR
PINTEREST, FACEBOOK OR TWITTER ACCOUNTS


Friday, November 17, 2017

Rosemaling Witch Hat

Hello Dear Friends:

For Halloween,  I designed and painted this Witch wood hat pin in the "Rosemaling" style...
in the Traditional Decorative Folk Art Painting from Norway...

rosemaling witch pin  front view

I saw this witch hat in wood and I wanted to do something with a "Rosemaling" flower on it...

How to make this project: 

1- You select the main painting colors (background and 2 or 3 more for your flowers and leaves)
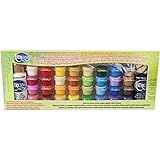
I use acrylic paints from DecoArt (Amercicana line)...
Note: Even though "purple" is not a traditional "Rosemaling" color I decided to use it just because I like the combination of the blue with the purple...
in creating there are no rules...right?

2- after selecting the colors you base coat the hat
3- Then proceed to draw a very simple flower (either free hand; as I did or copy/trace a flower that you like)

Note: I believe this one could be in the "Telemark" style because if the shape of the leaf...

rosemaling witch pin first steps

- start by using some of the basic brush strokes ("c" and "s" ) to make the flower and petals
(if you do not know these strokes yet, simply fill in the empty shapes with color)

- highlight some areas of the flower and leaves  (with a lighter color)
and shade some others (with a darker color)

- add additional small strokes to embellish even more the flower ("s" strokes)
- finally  finish it with some linework to outline the petals and leaves

rosemaling witch hat front

Finally, Give 3 coats of varnish
I used "Tripple Thick" glaze from DecoArt

rosemaling witch pin varnish

Even though I am still in a learning process and I do NOT master my strokes I am very pleased with the results...

As Salvador Dalí said, "have no fear of perfection! you will never reach it!"
seeing this quote on the positive side, do not fear of mistakes...You are not perfect!
So I encourage you that even though you do not feel as an expert, or feel that you can not design your own pieces, just try doing something simple and small as I did. 
Practice and repetition will make you better and more confident day by day...without fear of making mistakes...
"Embrace your imperfections!!!"

rosemaling witch pin varnish

This project was so easy and pretty to make that, as you can see in the photo, I made several hats to give away...

rosemaling witch pins

Last View...

rosemaling witch pins with paints

I hope you have enjoyed this quick painting project 

Thanks for the company 
I will see you soon with another painting 
or paper craft project, 
stayed tuned...
Hugs

Supplies:


Saturday, November 11, 2017

Witch Pin with DecoArt

Hello Dear Friends:

For Halloween at my painting class with My teacher Carl Larson, we made this cute "Witch pin" designed by Jamie Mills Price called "Wichypoo Pin"

witch hat pin front

using DecoArt acrylic paints from the "Americana" line

witch hat pin supplies paint bottles

Below, you can have a pick of my painting setting in my garage...full of paints, water,  brushes and wood!!!

To see the post that I made on my own designed "Rosemaling" black easel painting (photo)
click HERE

painting setting

 below you can see the process of some of the steps in painting these cute lapel pins...

witch hat pin steps

close up
witch hat pin finished

finished with 3 coats of varnish for extra shine...

witch hat pin supplies varnish

This product is great and gives an excellent shine

witch hat pin shine

Last view of the group

witch hat pin group
 
if you would like to get this pin and design please visit 
 Jamie Mills Price Site: "Between The Vines" HERE 

Thanks for the visit
 and see you next time...

Friday, September 8, 2017

Three Cards for Men

Hello dear Blogger Friends:

I have today three sample cards  for three different occasions to give to those men in our lives...
For some reason I hear constantly around card makers and students that cards for men are difficult to design...
So here there are 3 samples for you to get inspired and choose from...
I hope you like them!

1- First...we start with a Happy Birthday card...
The background was made using the re-inkers from archival inks from Wendy Vecchi and alcohol...on "specialty stamping paper" which is crucial to achieve the technique!

The technique TUTORIAL;
on how to make this background can be found:  HERE


happy birthday card fro men with re-inkers and alcohol front

detail of the delicate "tools" die frame from Memory Box...
and the die for the "Happy Birthday" script die from Memory Box also...

happy birthday card for men with re-inkers and alcohol detail

last view of the back panels in diagonal die cut from the postage stamp squares die

happy birthday card for men with re-inkers and alcohol

2- This Second card can be use for any occasion
or for some men in your life that play music or just like music ... Who doesn't?

all occasion music card for men front

The background was made using 2 unique and different dies meant to be used as edges (the "sheer circles" and the "cubic"  edges dies) but here I decided to create a background with them...and place behind papers of different colors...

all occasion music card for men detail background

for the Corner I placed the "Tall Fern Corner" die from Memory Box

all occasion music card for men front view


3- And lastly but not least...one of my favorites...
A card made using "Silks Acrylic paints", which I love using them...on watercolor paper

More SAMPLES
for the background using SILKS can be found HERE


thank you card for men using silks acrylic paints side

a "steampunk" corner die was used to complement the colorful background
In this photo you can see the shine of the paints...
all mounted on white "Linen" cardstock paper! (for the back panels)

thank you card for men using silks acrylic paints

Front view
thank you card for men using silks acrylic front


Thanks you for your company
and see you next time!
SUPPLIES


Wednesday, September 6, 2017

Paint your Own Coffee Mug

Hello Dear Friends:

One of the lessons with my Dear painter Teacher, Carl Larson, was to start designing your own piece...
and here it is what I designed...Y created this circular array of roses on canvas paper to be inserted later into my Coffee Mug...  and have a Unique mug...

paint your own starbucks coffee mug with decoart acrylic paints

The style chosen to start creating your design was "Canal Boat", painting.

First I gathered my supplies: a canvas pad of paper, some acrylic paints from DecoArt, Americana and a mug from "Starbucks"...(top left corner of photo)

paint your own starbucks coffee mug on a canvas pad

here are some of the steps...

- Trace the shape of the insert from the mug (included in your mug) onto the canvas paper...
- Paint the whole background with acrylic paint in Black (or dark green: traditional background colors for "Canal Boat" painting)
- paint a cluster of roses and leaves in primary colors ...in a circular and symmetrical way
circles for the roses and ovals for the leaves with on top some comma strokes...

paint your own starbucks coffee mug on a canvas pad step 1

- add some filler flowers and various sizes of comma strokes to suggest movement

paint your own starbucks coffee mug on a canvas pad step 2

 - complete your design by adding strokes on top of strokes... (for shadows and highlights)

paint your starbucks coffee mug on canvas pad with canal boat painting style

- here are some of the basic strokes learnt in class for this type of painting:
how to make roses in primary colors,  some leaves and filler flowers...

 canal boat painting style strokes

- when finished, cut the shape of your mug

 canal boat painting style on canvas paper

- insert canvas onto mug

 canal boat painting style on canvas paper insert onto mug

and here it is my finished Mug
front

starbucks coffee mug decorated in canal boat painting style
back
starbucks coffee mug decorated in canal boat painting style; back

side
starbucks coffee mug decorated in canal boat painting style; side

History Note:
This style of painting is also known as "Narrow Boat Painting" and it is the colourful folk art from England that was used to decorate working narrow boats used on canals.
By the end of the 19th century it was common practice to paint roses, various other flowers, castles, churches and cottages on narrow boats, their fixtures, fittings, furnitures and even utensils, known as canal ware.

Instead of using a more "traditional" utensil as in old times (such as buckets, milk cans, metal boxes etc)  I decided to give to this "old" style  a more modern approach and use an every day mug from "Starbucks"...
An old idea combined with a 21st century every day utensil...


starbucks coffee mug decorated in canal boat painting style with decoart paints

I hope  this gives you some ideas on how to incorporate the old with the new
and create your own custom coffee/water mug!


Thanks for the Company
and see you next time 
for another craft/painted project ...

SUPPLIES