I discovered recently the line of "Mix Media from DecoArt"...
I got these "Media Misters"..
and here it is a
101 Tutorial on Mixed Media
Mister Techniques
Mister Techniques
This is a LONG TUTORIAL ...
I will be sharing today
10 different fun techniques using the "Media Misters"
to create amazing backgrounds and incorporate these backgrounds onto finished cards.
And I will add at the end 4 more techniques done by Andy Skinner and shared over at the "Mix Media Decoart blog"
BACKGROUNDS
USING THE MISTERS
CARDS
FROM THESE BACKGROUNDS
ONE BY ONE...
TECHNIQUE #1;
WITH A "DRY" BRUSH
WITH A "DRY" BRUSH
- Spray a "heavy" rainbow sample of colors onto heavy cardstock
- Drag color upwards with a DRY brush
Final background result
TECHNIQUE #2;
WITH A BRUSH AND WATER
-Mist "lightly" sparingly some green and blue colors onto heavy cardstock
-Immediately, Paint with water. With a WET brush paint in various directions
Final background result
Card using this background
Detail
TECHNIQUE #3;
MISTING WITH WATER
MISTING WITH WATER
- Spray two colors onto heavy cardstock and spray water as well to dilute color
Final background result
detail
TECHNIQUE #4;
Dripping and Misting
WITH "SHIMMER" MISTERS
- For the "blue and green" background move cardstock around to create "drippings"
- Add "Shimmer Mister" to add some sparkle
TECHNIQUE #5;
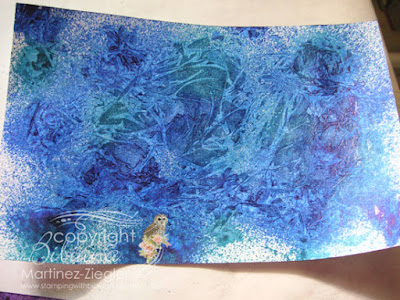
WITH PLASTIC WRAP
- Spray some blues onto heavy cardstock
- Place INMEDIATELY over it some plastic wrap with lots of wrinkles, let dry (overnight if possible)- when dry lift plastic and reveal background
with left over background make some bookmarks or tags
TECHNIQUE #6;
USE DIES AS STENCILS/MASKS
-Die cut a shape: bird cage
-place onto paper as a mask
-Mist lightly with green and blue
- lift "mask"
TECHNIQUE # 8:
WITH LEFT OVER INK
on Craft sheet
USE DIES AS STENCILS/MASKS
-Die cut a shape: bird cage
-place onto paper as a mask
-Mist lightly with green and blue
- lift "mask"
TECHNIQUE #7;
USE NOZZLE to create SPLATTERS
TECHNIQUE # 8:
WITH LEFT OVER INK
on Craft sheet
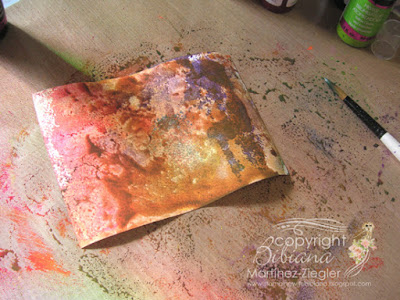
-place watercolor paper (for texture) onto craft sheet and soak left over ink from any of the last techniques
- turn over to reveal background
Final background result:
- turn over to reveal background
Final background result:
Another background result using the left over ink.
From Technique #3: plastic wrap with blues
From Technique #3: plastic wrap with blues
Card using this background
Detail: using the "bird cage" die that we use as a mask on technique# 4 (dies as stencils)
Detail: using the "bird cage" die that we use as a mask on technique# 4 (dies as stencils)
TECHNIQUE #9
WITH Coarse SEA SALT
- Spray a sample of colors onto heavy cardstock
- Sprinkle "Coarse" Sea salt and let it dry overnight - wipe away salt
Tag/Bookmark using this background
TECHNIQUE #10;
WITH BABY WIPES
WITH BABY WIPES
- Spray 3 colors (blue, green and purple) onto heavy cardstock
- with a "wrinkled" baby wipe, tap the paper several times to lift color and make textureview of the trio of tags
4 OTHER TECHNIQUES
from Andy Skinner
from Andy Skinner
he will go briefly on how to use these misters over
GESSO
CRACKLED Paint
ROLL OF PAPER TOWEL
USING A BRAYER AND A STENCIL
INFO on misters:
these misters come in 12 PERMANENT colors...
8 "regular" colors and 4 "Shimmer" misters
The colors are very vibrant and deep in comparison to other brand names of misters out there.
A last view of the group cards
I hope this extensive tutorial
will inspire you to try at least one of these techniques
Remember keep on crafting
and discovering new outlets to express yourselves,
if you liked this tutorial
shared it on all your social media outlets
hover over any photo and share it!
will inspire you to try at least one of these techniques
Remember keep on crafting
and discovering new outlets to express yourselves,
if you liked this tutorial
shared it on all your social media outlets
hover over any photo and share it!


This is so super cool Bibiana. All the end results looks fabulous, and the colkors you used for them is amazing too.
ReplyDeleteThe most fun thing about seing this is, that these techniques is not even new, only to papercrafting, but I recognize several of them here from many years ago, when I was silk painting, where we used m,any of the technicques too, I just never thought of using them here in papercrafting too, which is actually fun, as now it seems sooo obvious to use many of these here too. And one thing is for sure, it looks really good, and I´m definitely going to try it, and even have several of the items to use for it from back then.
Have a wonderful week-end and thanks sooo much for opening my eyes, when I couldn´t do so myself LOL.
Thanks for those ideas and the link to Andy. On technique no 3 did you cut the gold card out yourself or is that a die. Couldn't see anything that matched in your list at the end. Gorgeous dies you have used too.
ReplyDeleteHugs, Net xx
I did cut myself with a paper cutter the papers on the gold card. no die was used...
Deletethanks for visiting
bibiana
I don't like too much mixed media (and I never use this kind of technique) , but your cards are fantastic!
ReplyDeleteTu es très généreuse de nous montrer tout celà, merci !
ReplyDeleteLovely seeing all the backgrounds and then how you used them. Some really great cards.
ReplyDeleteet moi qui jette mes papiers que je trouve pas top.... maintenant , grace à toi , je fais m'en servir merci bises
ReplyDeleteWow Bibiana a lot to take in here today. So many beautiful backgrounds and techniques along with the cards you created. Beautiful.
ReplyDeleteWoww Bibiana que padre post, cuando llegue ami casa lo leere cada técnica con toda la calma del mundo y lo pondre en practica por lo menos un jijij junto con mi princesa le encanta!!! mil gracias por compartir este hermoso post !!!
ReplyDeleteSaludos...
merci pour tous ces partages, A+
ReplyDeleteVery interesting I like doing mass back grounds and just letting the cards develop like yours are doing here .......Lis
ReplyDeleteGreat tutorial. Thanks for having it all in one place. I'm wondering how you get your paper to lie flat. My watercolor paper is always wrinkly. Can you iron them?
ReplyDeletemerci pour tous ces tutos !!
ReplyDeletetes cartes sont très belles
bises
vraiment genial tous ces fonds, merci pour le partage, bisous
ReplyDeleteBibiana Your lovely tutorial came to me from another blog. I'm so glad that I came and looked. I love the variety you have achieved and as I have been creating backgrounds in many ways I will be sharing your creative loveliness with some of my readers too.
ReplyDeleteOh my these are fabulous, my favorite it the one with the plastic wrap, I pinned it to pinterest so I can go back and check them out when I want to try them, thanks for sharing!
ReplyDeleteSuperbes toutes ces techniques
ReplyDeleteBravo
Bisous de France
Merci Bibiana pour toutes ces techniques. Toutes tes cartes sont superbes.
ReplyDeleteBisous
Wow some amazing techniques ! Love the results x
ReplyDeletemerci beaucoup ma tite bibiana pour tous tes tutos
ReplyDeletede superbe technique et un rendu trop trop magnifique
j adoreee encore merci gros bizou et doux dimanche
Merci pour ces tutos, cela prouve que même les fonds qu'on ne juge pas "réussis" peuvent faire de bien jolies cartes.. je les regarderai autrement maintenant !
ReplyDeletede superbes créations !
ReplyDeleteWhat a beautiful grouping of cards. I loved how you let us peak at the unfinished backgrounds. You turned them all into beautiful pieces of artwork. You are truly talented Bibiana.
ReplyDeleteSuperbes toutes ces techniques Bibiana ! Il n'y a plus qu'à tester ! Bonne semaine à toi ! Bises
ReplyDeletewaouh tu as le chic pour tout faire en beauté bravo
ReplyDeletebisous
J'adooore, il ne me reste plus qu'à acheter des sprays! C'est trop beau!!
ReplyDeleteMerciii
Bisous
OMG !! Magnificos trabajos. Bellos todos ellos por Dios no hay de donde escoger manitas de artista!! Todos los elementos usados son preciosos!!
ReplyDeleteSuperbes réalisations et techniques, bravo!!!
ReplyDeleteBisous
Qué hermosísima entrada! Gracias por compartir tantas técnicas! Algunas conocía pero otras no!!!
ReplyDeleteTal vez mañana publique tarjetas con ese hermoso troquel que me enviaste y voy a incluir el link a esta entrada porque me parece muy útil! Un abrazo!
C'est toujours très intéressant de revoir tes anciens tutos ! Merci !
ReplyDeleteMerci pour ces tutos, je pourrai patouiller à l'aise avec les encres. Des techniques qui offrent un beau rendu sur les fonds et c'est assez tentant... Bises
ReplyDeleteMerci pour ces techniques, j'aime beaucoup et je vais essayer.
ReplyDeleteScrapamitié