
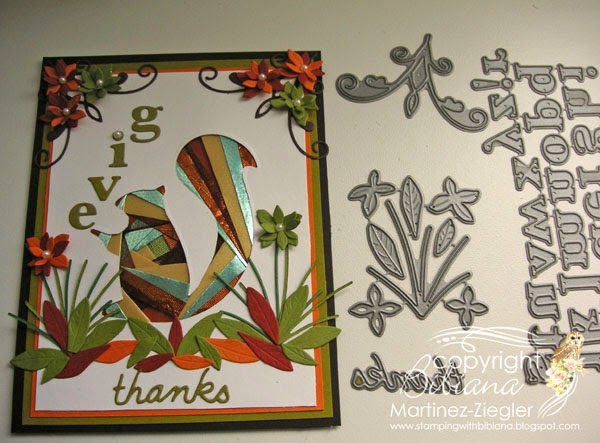
Today I am bringing to you this card perfect for Thanksgiving or Fall season ...the Squirrel die is perfect for the occasion and it features the Iris Folding technique...which I embellished with some die cuts...

If you liked this photo click on "Pin It" Button: 

Back when I learned this technique you needed a pattern with a pre-determined cut shaped that went on top of the pattern...
Now with the out pouring use of steel dies, I said to myself it must be a way to use my dies for the cut shaped, make my own custom made pattern/template and this is how I came up with this Tutorial that I am offering to you today. So here we go...
TUTORIAL: "IRIS FOLDING'
"Make your custom made PATTERN
to use with YOUR own dies"
FIRST: Choose the die that you want to use... this will determine what shape your pattern/template will look like. Try to see in what geometrical shape the die will fit...
the clouds have 3 tips so it will fit in a triangle
the pine definetely is a triangle
the ornament looks like it can fit in an octagon...
the butterfly looks like a square
and the squirrel is a rectangle...

If you liked this photo click on "Pin It" Button:

Step 1: choose your die, in my case is the Squirrel die, which fits in a rectangle, measure it (from top to bottom and left to right)
follow the steps (a-b-c-d) from photo below ...

a- draw a rectangle slightly bigger than the die (mine is 3" x 3 1/2") ...1st drawing: Base/shape...
b-make a 1/4" mark on one side of the rectangle (or the shape that you choose to draw),
turn shape make another 1/4" mark on this side,
turn paper make the mark
and so on until the rectangle has ALL four sides with these marks...
trace a line from point to point, this will create one rectangle tilted inside the 1st rectangle...(see 2nd drawing on the top right)
c- make a 1/4" mark on one side of the rectangle just traced, turn shape make another 1/4" mark on this side, turn paper make the mark and so on until this last rectangle has ALL four sides with these marks...
trace a line from point to point, this will create 2 rectangles tilted inside the initial rectangle...
(3rd drawing, left bottom)
d- repeat process...until no more room to draw another rectangle...
the last rectangle is called the IRIS
(4th drawing, right bottom)

Remember YOUR geometrical shape pattern (rectangle, triangle, square etc) and measurements will be accordingly to the die that YOU choose to use ...
My squirrel fits perfectly inside this rectangle...

Step 2: after creating your own custom pattern/template...
gather all the supplies to start making the "Iris Folding" technique
a- take a white sheet with my squirrel died cut in the middle (this is the negative piece)
b- take different color papers or textures (brown ribbon, copper embossed foil paper, teal/green foil paper, parchment gold paper)
c- the pattern that you just created

I choose the IRIS to be in the center of the body of the squirrel...
cut all your strips of paper @ 1" and fold in half... (copper paper, teal aluminum, gold parchment); have ready your brown sheer ribbon

Step 4: start placing your strips of paper and/or ribbon...following the lines
secure with regular scotch tape at both ends
one copper, one teal, one parchment, one ribbon and repeat process...
until done with that section...(the tail)
remember you are working on the reverse side of your card
NOTE: I did not add numbers and letters as it is customary to each line on the "Iris Folding" pattern already made (example: color A #1, 3, 5 etc ) because it was not necessary, I decided to follow my own colors (copper, teal, parchment, ribbon and repeat) as I went on each section...
If I had placed numbers to my lines, since this is done in a rotation mode ALL my tail would of being ALL in ONE color and I did NOT want that...(difficult to explain...but just follow your colors: color A, color B, color C, color D and place them in the sections that you consider they will look good)

Step 5:
continue the same process on the bottom section of the tail...and so on until done!

Step 6:
if you lift your paper this is how it looks on the right side...

Step 7:
this is when is done...right side...

Step 8:
decorate as much as you like the front...
simple way...

In my finished card I used these dies...
Close up of the flowers...

Close up bottom part...

This time I did not use stamps to decorate the front, but if you would like to see another sample using The IRIS FOLDING technique paired with stamps click on : "Iris Folding Easter Ladies Hat"
SO Now this tutorial on how to create your own Patterns using your dies the possibilities are endless!...
ENJOY!
Thank you for your visit and I will have GREAT NEWS to share with you very shortly!!!
SUPPLIES:


Ohohoh!! It seems to be so difficult and it is such a lovely card!
ReplyDeleteSometimes stamps are not necessary, you are right! The little flowers are so cute - once again I'm very fascinated!!
Viele Grüsse, Andrea
Wow this is fab ! Love those cute little flowers x
ReplyDeletetrès réussi!!
ReplyDeletebisous
coc♥
Lovely card and great tutorial. Haven't done Iris Folding in some time.
ReplyDeleteI'm always in awe of someone who can do this. I struggle with it. Thank you for showing us your tutorial. Your card is so, so, so beautiful.
ReplyDeleteFun card Bibi! I love Iris folding and you had created an amazing and colorful design.
ReplyDeleteC'est très beau!
ReplyDeleteBisous Bibianna
Bravo Bibiana ! Ta carte est splendide ! J'aime beaucoup les couleurs et ton iris folding est très réussi ! Bises
ReplyDeleteHi Bibiana,
ReplyDeletethis is so cute with the lovely iris folding squirrel. Thank you for the lovely tutorial on this. Super flowers too.
Lots of crafty love. Jenny L.
So creative....and so much work for this sweet little guy! Love the tutorial. Perfect for the fall.....love the details.
ReplyDeleteHello my lovely Bibiana, I love seeing iris folding, that is the prettiest squirrel I ever did see, the card is GORGEOUS, and an EXCELLENT tutorial, thanks for sharing..
ReplyDelete