A quick tutorial on:
how to paint with acrylic paints
a Cobblestone pathway...
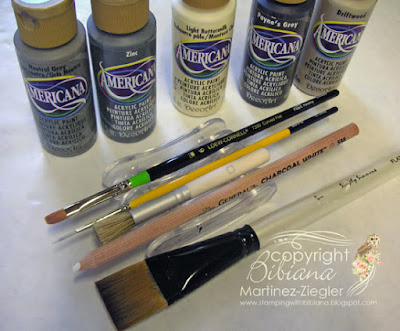
I used of course my little favorite paint bottles from DecoArt: Americana...
Gather your supplies; some paint, some brushes and a surface....
The colors are:
Neutral Grey
Zinc
Light Buttermilk
Payne's Grey
Driftwood
Tools/Brushes:
a flat 1" brush for the basecoat, a liner/ round #2, a curved flat # 6 for the side load, a stencil brush and a white charcoal pencil
Surface: a wood piece...for final project (note: tutorial was made on paper)
Step1: Base Coat and trace lines;
- base coat with "neutral grey" the entire surface with 1' brush
- with a white charcoal pencil draw lines for stones
(first make vertical wiggle lines then draw some twisted horizontal ones, until you have covered the hole area)
Step 2: Paint lines
- with liner/round 2" brush with "zinc" paint, make them thin and thick
Step 3: Side Load/Float
- with 3 different colors/shades
"Side load/Floating": refers to a painting technique, where you add shading or highlights with a flat/curved or angular brush that is loaded ONLY on one side with paint and the other half loaded with water or extender
- with "light Buttermilk" in some areas of each stone, then with "driftwood" and finally with "Payne's Grey" to give a "blueish look"... this is very random
Step 4: Stipple
- with a stencil brush very lightly with the 3 colors mentioned above...and randomly!
Step 5: paint again the lines
- with "Zinc" and Voilà!...
Why to make a cobblestone pathway?
I will show you this project very soon...stayed tuned and keep on the look for it!
It is very cute!!!
happy painting...or crafting!!
Until next time my friends!
SUPPLIES


A great tutorial Bibiana and such a lovely realistic effect.
ReplyDeleteHugs Erika. x
How clever and beautiful. Thank you for the tutorial Bibiana.
ReplyDeleteLove & hugs
Jacquie J xxx
http://jewelscardcraft.blogspot.co.uk/
Thank you for the tutorial. A very cool effect. Look forward to seeing the Halloween house. Hugs
ReplyDeleteOh wow, what a gorgeous cobblestone path!! You did an amazing job with it!! Thank you for the fabulous tutorial, too!! Love this!! Have a great day :)
ReplyDeleteLisa
A Mermaid's Crafts
Oh my you did a fabulous job on the stones, they look so real with all your shading, look forward to your project!
ReplyDeleteSuperbe !!!! merci pour le partage.
ReplyDeleteBises.
Merci de nous offrir ce petit cours !
ReplyDeleteWow, beautiful color and effect with your cobblestone pathway, it looks stunning. Looking forward to your Halloween house.
ReplyDeleteWOUW this looks sooo realistic, and woulæd be a perfect wau to make garden paths too, if we´re making a gardenpicture and also as you sauid for a driveway in front of a house or something simular.
ReplyDeleteThanks sooo much for a great tutorial here, it looks awesome and is sooo easy to underrstand, that even I might be able to do this ha ha ha.
Have a wonderful week-end and lots of great fun.
Very clever technique Bibiana and so effective thank you for showing us the technique
ReplyDeleteAnne
What a fabulous tutorial !!
ReplyDeleteCheers
Dr Sonia
Cards Crafts Kids Projects
bravo bibiana tes explication s sont super merci
ReplyDeletebisous
Oh my, you're such a tease. I can't wait to see what you do with this cobblestone. You make me miss painting so much. When I go visit my daughter in September, we are going to a class where there will be a painting party of 40 woman all painting the same scene. The instructor is going to guide us along so we all end up with the same picture. I chose the class with the Toronto nighttime skyline with water reflection in the water. I'll be sure to post it when it's done.
ReplyDeleteBeautiful variety I can think of many ways to use them ...........Lis
ReplyDeleteThat is amazing!! Wonderful tutorial!
ReplyDelete