
Do you want to maximize the use of your dies?

Technique #1: Inlay ( consist on inserting back onto the negative space the positive die cuts, to create a flat surface with inlaid pieces)

I first started by die cutting the words ( 2 times in white cardstock) and without taking them out from their base, I colored them with "Copics" by tracing lines in 3 shades of blue..
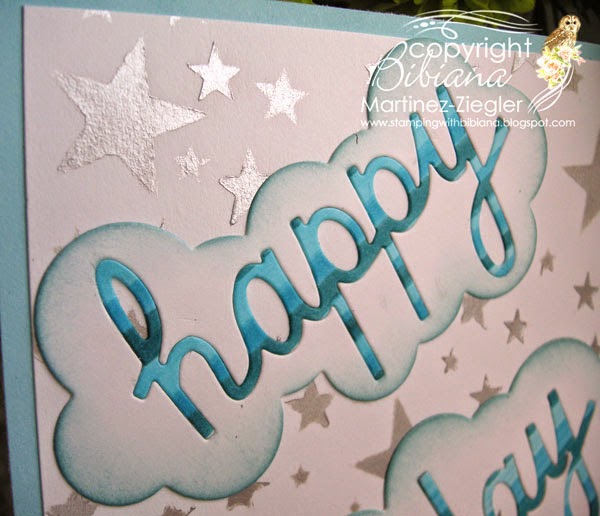
NOTE: the background was stenciled with a metallic rub "Viva Inka Gold: in Silver", I love using these rubs they are so smooth, easy to use with stencils and they give great shimmer... give them a try!
I use the NEW spring release stencil from Memory Box called "starry night"
Important: place behind the word a "Post-it Adhesive Label" ( see photo yellow paper picking behind). This is to avoid loosing the small pieces that you will need for the 2nd card

then; lift the colored word and place it inside the "negative" part of the white cloud (the second die cut that you did)

see detail of the inlaid letters...and the shimmer of the metallic rub!
The 1st card is done!
note: keep the small pieces attached to the yellow "post-it adhesive label" to make the second card
Technique #2: Use of the negative pieces (the ones that you will throw)
once you have removed the colored word, (for the 1st card) you are left with the "negative" part of the cloud! well use these pieces to make a second card...this way you are maximizing your paper and die cuts...

Place the clouds, (the ones you were going to throw) in a dotted green paper to make your 2nd card and do not forget to put inside the words the small pieces left stuck on the yellow "post-it adhesive label" for the letters (b, h, a, p etc...)

Detail of the colored "negative" clouds.
I added some more clouds in white with some cotton that I glue on top of them...

Technique #3: use of the Positive pieces and make a background with the negative ones

place the 2 dies with scotch tape in a white cardstock, run it through the machine.
lift the words and keep the negative as a background...
lift the words from the clouds and insert them in the background
detail of the words inside this "background".
Mat the card in a contrasting paper (dotted blue paper)
and embellish with pearls, a butterfly vine die cut and some pearls with the "Viva decor pen"

a last view of the trio

I hope you can see your dies with another view
and stretch your dies at their maximum use...
and stretch your dies at their maximum use...
Thanks for the company and your kind comments...
SUPPLIES:


I was just looking at sentiment dies before doing my hopping. Your cards are wonderful!! I love how you used the positive and negative cardstock. Not only are you saving some tree, but you are creating beautiful card that will be cherished!! Love your embellishments and the cloud look too! The colors are lovely!!
ReplyDeleteGreat post Bibiana, I love the inlaid sentiment. Maddy x
ReplyDeleteWhat a great way of using these dies. Jenny x
ReplyDeleteWhat a fantastic trio of cards x
ReplyDeleteGreat post Bibiana, very interesting and love the cards. xx Flora
ReplyDeleteLove the cards. Such great ways to use the dies.
ReplyDelete3 pretty cards using the die cuts!
ReplyDeleteLike how you did these cards! Nice chatting with you.
ReplyDeleteHello Miss Bibiana, all three of the cards are beautiful, you are so creative, and lovely to share this...
ReplyDelete