hover over

HOVER OVER ANY PHOTO AND SHARE IT ONTO YOUR
PINTEREST, FACEBOOK OR TWITTER ACCOUNTS


Showing posts with label center step card. Show all posts

Monday, October 31, 2016

Happy Halloween! Center Step Card

Happy Halloween!

center step card for halloween

I made this center step card using various punches and some dies (some are retired) from several companies...

center step card for halloween side

details...
witch hat made with 3 basic punches (circles:1" and 2" and a tree) glued to a clothespin, found tutorial in Pinterest...
bow "Memory Box" die

center step card for halloween witch hat

Owl from "PoppyStamps" dies (retired)

center step card for halloween owl

butterfly and clouds : "Memory Box"
ferns: "Spellbinders"
Bats: "Martha Stewart" Punch

center step card for halloween butterfly
and the back...
die from "Cottage Cutz"

center step card for halloween  back

photo taken at night in my craft room...it looks pretty with some shadows

center step card for halloween

last view
spider web doily cut in half and placed on the back

center step card for halloween

FREE PDF
for tutorial on how to make a center step card download a FREE PDF that I made HERE
My card 5x7 is bigger than the tutorial, just adjust the measurements...but the cuts and score lines are the same...
PDF center step card
I made  a treat bag to go along: stamps Stampin'Up!

halloween treat bag

and baked some chocolate chip cookies to insert in my treat bags...

halloween treat bag

these were given to my painter friends ...
and for the children some cauldrons filled with candies

halloween treats

you can also make a simple version, single A2 card using just the designs from the front panel...

halloween owl card


This second card was featured at the Spanish blog : "A crear se dijo"! for Memory Box... for this one I used all dies from MB.

halloween oak ghosts card

 details
halloween oak ghosts card ghosts

halloween oak ghosts card pumpkins
lats view

halloween oak ghosts card

want to see more, visit my INSTAGRAM...
thanks for the company

***NOTE: I will resume with my Christmas Posts, shortly...stay tuned


HAPPY HUNTING 
and have a safe day!!

SUPPLIES


Monday, May 26, 2014

Center Step Card for Memorial Day

Hello Dear stamper Friends:

In honor to all the women and men 
giving their lives to maintain us safe!
and served this country!

Happy Memorial Day!


I choose to make a "center step card" to display the gorgeous bridge die from Memory Box
Click to enlarge the photo for the instructions
CLICK TO Get the PDF 


 A closer look  to the bottom of the card
You can adapt this card for any patriotic event, such as 4th of July.
It can be as well a perfect  for a masculine card !!!


and a view of the balloons with some rhinestones and the clouds were die cut from felt...


A last photo from the side


Thanks for the visit... 
Follow on Bloglovin


SUPPLIES


Monday, January 14, 2013

A Valentine’s Shaped Card

Hello Dear Stamper Friends:

Today, I am sharing with you a Valentine’s card so that you can start having ideas for your cards.
Shaped cards are wonderful to display small scenes; they are like Dioramas, three-dimensional museum models without the glass…
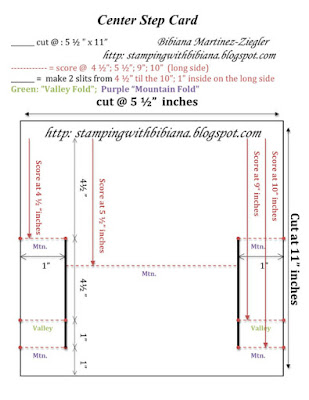
This particular model is called a “Center Step Card”.


Suggestion of the day
“Do not put aside your “old stuff”… And mix and match!”

Most of the supplies used in this card are current items that you can find easily at any craft store.
But… As I mentioned in my “Quick and Easy Wintertime Post” (Jan. 9, 2013):
use what you like and have. It is wonderful to get new stuff, oh yes!
But do not forget as well all the items that you have being collecting over the years! You can easily substitute, some things that I use by the ones that you have and are “collecting” dust in your shelves! 
The sentiment that I use is one that I found at a garage sale and so appropriate for the balloons: “love is in the air”. I believe is a retired stamp from “Lockhart Stamps”…most of the dies are from “My Favorite Things”, I use some “Spellbinders” and the punches are from “Martha Stewart” and “Stampin’Up!”…So mix and match!

Instructions:
Click on photo to enlarge...
click HERE  to get the PDF
(PDF found on toolbar, section "More" as well...)


  TipS:

1- Glue together several die cuts of the same image to give this 3D effect.
You can do it with many images, I did it with butterflies and it looks really nice…they pop from the card, giving it more interest.
For the balloon: I glued 7 hearts (one flap glue to the next flap) and it looked like the globe of the balloon,

2- Give to your punches other shapes: for the basket: I free hand cut it. But you can use a square punch and then trim diagonally (from one corner to the other) to give the shape of the basket.

3- Use the “negative” from your dies or punches: The mini hearts: are the “left overs” from the “Martha Stewart” edge punch.

4- Use different materials to give texture to the card: here I use felt for the clouds, but you can substitute it by using “Flocking”, one of those products that we have and tend to forget…so Get it out and use it!


right view


 left view

Ok , I hope you enjoyed this post, the tutorial on “Center Step Cards” is found HERE at SCS

I will be back with more Valentine’s projects so come back soon and remember leave me a comment: I really read them! And if you have questions I will answer them in that section!
Bye and …OH!...remember to decorate the back of your card too! as shown here...


UPDATE: 
CLICK To view a Patriotic center step card for Memorial Day

Supplies: