hover over

HOVER OVER ANY PHOTO AND SHARE IT ONTO YOUR
PINTEREST, FACEBOOK OR TWITTER ACCOUNTS


Showing posts with label stencils. Show all posts

Thursday, October 27, 2016

Post 6: Christmas, Shabby Chic/Vintage style

Post #6
Getting Ready for Christmas

Hello My friends:
For the next Couple of days I will be showing you some Christmas Cards that I have made using Memory Box dies...
I hope these samples will inspire you to start planning and making them from now to avoid the "Holiday Rush"...
So let's start...

Today's post is all about 
Shabby Chic/Vintage Look

This Card is made in earth tones to mimic the vintage look and full of details to mimic the shabby chic look (appearance of age and signs of wear and tear, mixed with the new)...
It is in between...the two styles...

Shabby chic vintage card front

I made the background using some stencils in "vintage photo"  distress ink from Ranger/Tim Holtz

Shabby chic vintage  stencils

added some dies in shiny and glittery papers

Shabby chic vintage  detail deer

 last view

Shabby chic vintage last view


Thanks for the visit

SUPPLIES


Saturday, September 10, 2016

Fall Deer Card

Hello dear blogger friends:

In my last post I shared a card using the oval frames...
This one is one of my favorites...
the stencil, the patterned papers and the ribbon add so much interest to this card

fall deer card front

In this one I used sevaral versatile oval frames...( mix and match)
I used 3 oval frames: the pumpkins, the deer  and the trees frames ...

**** the forest trees were cut from a "wood veneer" sheet ...
the left over of this wood was used in the "Fall Country house card" from my last post
 So never discard anything !!!!!...

fall deer card detail

the background, the leaves,  were made with an stencil...

SEE POST HERE

for this stencil and how to used them (2 techniques explained in this post)

fall deer card detail sponged pumpkin

The pumpkins were sponged through the die on a patterned paper

fall deer card supplies

I will be showing you some more cards using these frames...
so stay tuned...


thanks for the visit

SUPPLIES


Tuesday, September 6, 2016

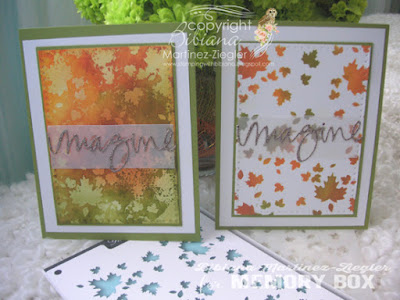
2 Ways Stenciled Fall Cards

Hello Dear Friends:

I used the same stencil to make these 2 cards...
using it in 2 different ways...

2 ways stenciled fall cards front

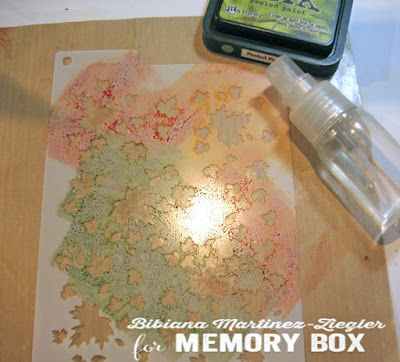
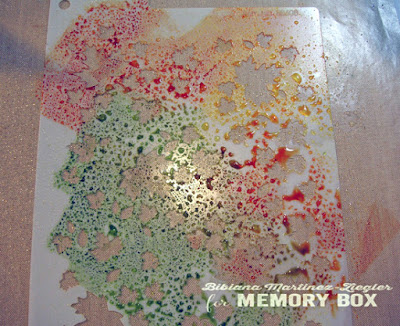
The first technique used in this card is to use your stencils as if it was a stamp...

stenciled fall card front

1-  ink the stencil as you do for a stamp

stenciled fall card front step 1

2- spray some water on top ( to add more texture)

stenciled fall card front step 2

 3- "stamp" the stencil on top of the paper;

stenciled fall card front step 3

4- then sponge some more color on the edges and center...
here it is the result;

stenciled fall card detail

using the exact same stencil I made this second card...
in here I used the stencil as "normal", sponging some ink colors with a dauber through the stencil...

stenciled fall card front

what a difference right?

stenciled fall card detail

In this 3rd card I used the stencil as "normal" too...
Sponging through the holes...

stenciled fall card

 final result
stenciled fall card

Ok my friends...remember to use your stencils for backgrounds or for main focal images using these 2 techniques...

stenciled fall card


Thanks for the visit...


SUPPLIES